Well, I 'opened' the axle some time ago. Guess what. It's beyond repair aswell. I'm gettin' tired with these axles already :) At the moment I can't go forward because of lack of parts. If you read this and have GOOD axle laying around for sale, let me know.
Drove 1000km christmas trip with S2. I was little worried how it copes in the extreme weather conditions (minus 32 degC at worst), but all went well. I had put a piece of cardboard in front of the radiator to minimize the airflow cooling effect during winter.
torstai 30. joulukuuta 2010
sunnuntai 12. joulukuuta 2010

sunnuntai 28. marraskuuta 2010
Update...
Long time, no update. The old axle is removed from the car and disposed. Looked for a replacement axle and ended up buying a whole spare car, a 1.4 106 XSI. Technically sweet running thing, drove it 100km from the selling location. I love short stroke TU-engines.
Holidays in the sun interrupted a bit and the unusually cold wether (it's -15 now, that's more than 10 degrees less than normal for this time of year) makes fiddling with the spare car outside not so tempting. It was nice to enjoy week in +27degC and swin in +23degC seawater. All inc. Did not gain any weight however, due to active holiday.
Anyway something has been done, I changed the side mirrors (to s1) which were painted to body color and paint had started peeling off making them look ugly. Removed some parts from the interior (xsi), some for my use, other for sale. Wheels were also sold. Front seats reused in S2. Improved the lighting in the garage by adding extra 150cm length fluorescent lamps ('loisteputki' in finnish) to the sealing. One just on top of a engine bay, other just above the working table. The lighting is now as good as it gets.
perjantai 5. marraskuuta 2010
Removing the broken axle
As I prepared for removing the broken axle, I measured the torsion bars and antiroll bar. Torsion bars were 18mm (original 19mm diameter, same in XSI>I). ARB was 18mm (original 21mm).
On a positive side, seems that no brake pipe work is needed. The brake pipe connectors opened just fine. And there is no load sensitive brake pressure adjuster neither.
On a positive side, seems that no brake pipe work is needed. The brake pipe connectors opened just fine. And there is no load sensitive brake pressure adjuster neither.
torstai 4. marraskuuta 2010
Situation normal, all fucked up
This rear axle is FUBAR. I'm gutted. Have to find a spare center tube. Why an earth did I sell my spare tube few months ago !?
tiistai 2. marraskuuta 2010
S1 Rallye work continue...
After what felt like a million small tasks (fitting door panels, blocking roll cage bolt holes etc) the S1 finally felt like ready for MOT. It was sunday however and I thought that I could do one more thing: put grease nipples to the rear axle. I drilled the right hand side first... When the drill went though the wall of the trailing arm - rust! I was completely surprised and must say - felt like an idiot! I had thought that the arm was ok condition. Time for a rethink.
After a brief thinking session, I was convinced I'd have to take the arms apart to see the condition of the bearings properly. The arb endplate was quickly removed from the drivers side with a help of 12mm (1.5mm thread) bolt.

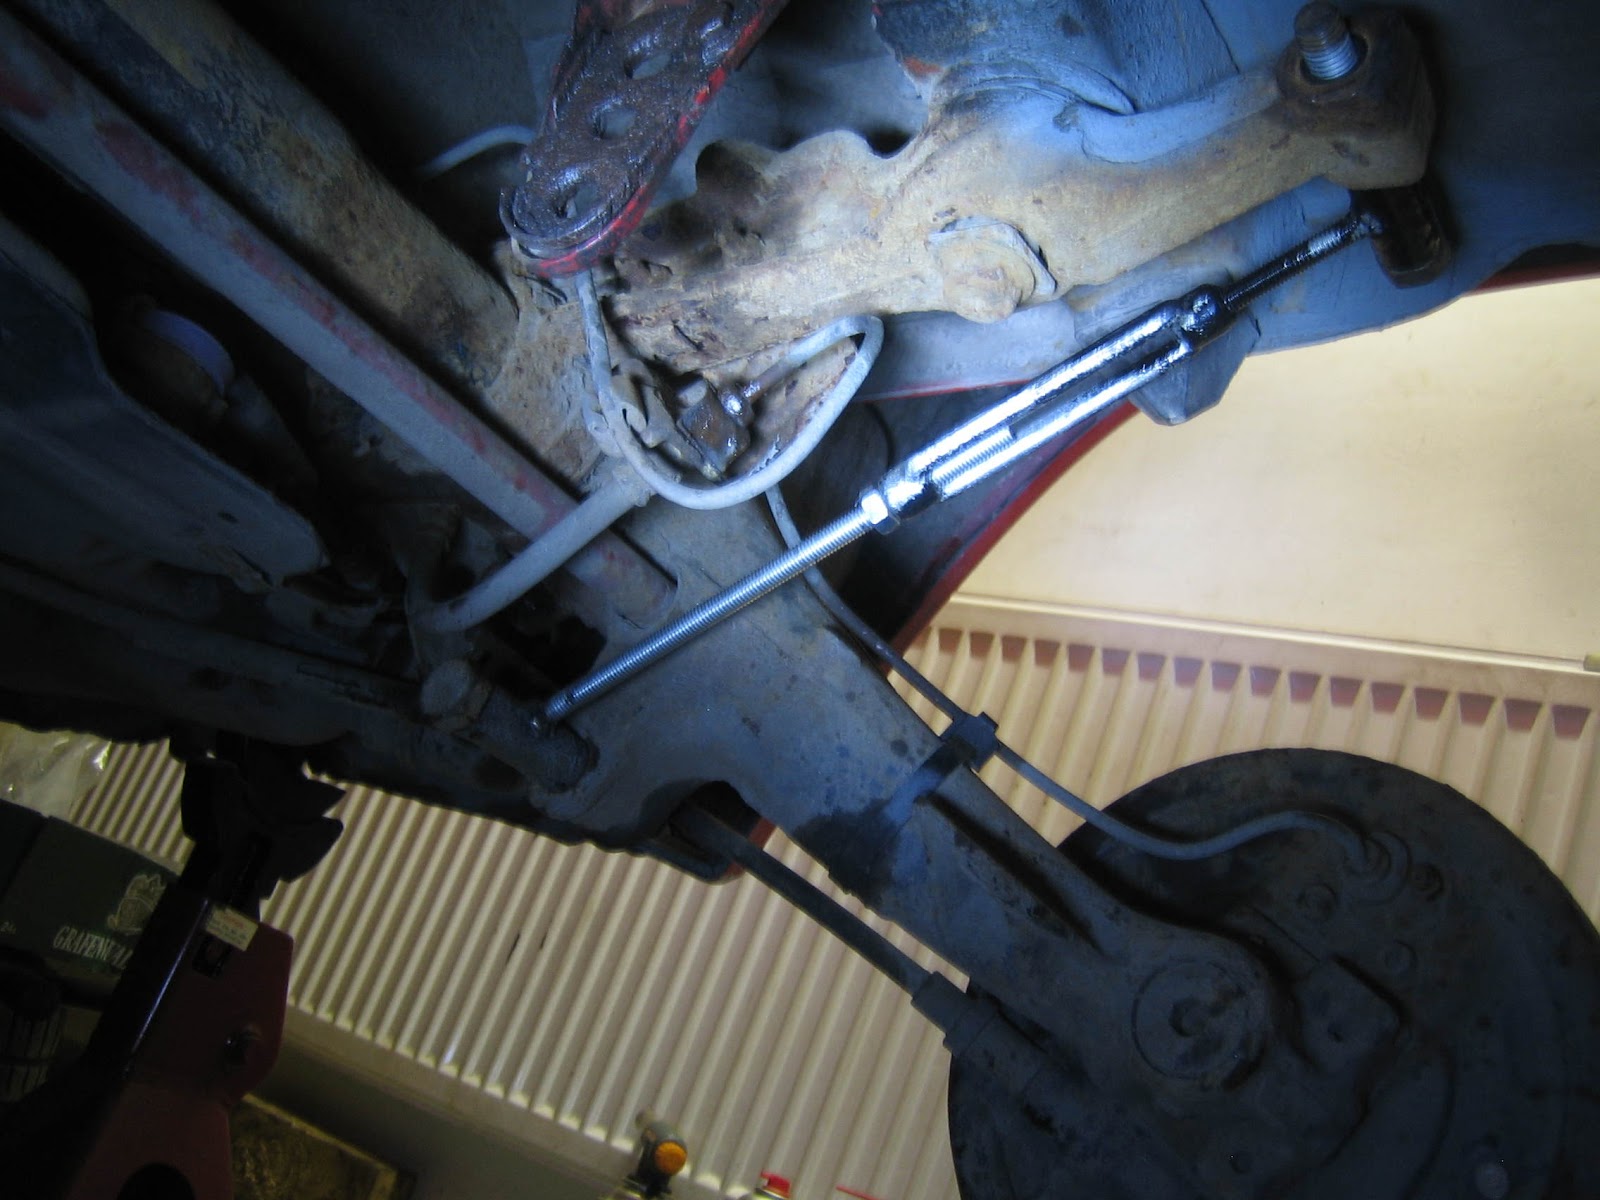
To get left hand trailing arm first, one must hammer from the right hand side:

In that picture I have already taken the T40 torx screw and offset washer out from the end of torsion bar. The washer was a bit tricky to remove because the lack of space. Also the support for the brake pipe was released to gain space for hammering.
Before hammering, I marked the position of the t.bars with two methods (one would have been enough):


It helps if one lifts the trailing arm from the drum to release torsion from the bar. Couple of hits (with homemade tool) and the bar is loose

View from the drivers side - the stub pin is in very good condition:

A bit of archeology is needed :) Looks bad but in reality not so difficult, a bit of WD40 will do wonders

ARB should be removed (or just loosened) before hitting the other t.bar, otherwise it adds unnecessary friction. It is after all quite tight fit to the stub pin.
to be continued...
After a brief thinking session, I was convinced I'd have to take the arms apart to see the condition of the bearings properly. The arb endplate was quickly removed from the drivers side with a help of 12mm (1.5mm thread) bolt.

To get left hand trailing arm first, one must hammer from the right hand side:

In that picture I have already taken the T40 torx screw and offset washer out from the end of torsion bar. The washer was a bit tricky to remove because the lack of space. Also the support for the brake pipe was released to gain space for hammering.
Before hammering, I marked the position of the t.bars with two methods (one would have been enough):

It helps if one lifts the trailing arm from the drum to release torsion from the bar. Couple of hits (with homemade tool) and the bar is loose
.jpg)

View from the drivers side - the stub pin is in very good condition:

A bit of archeology is needed :) Looks bad but in reality not so difficult, a bit of WD40 will do wonders

ARB should be removed (or just loosened) before hitting the other t.bar, otherwise it adds unnecessary friction. It is after all quite tight fit to the stub pin.
to be continued...
maanantai 11. lokakuuta 2010
S1 Rallye
This my another rallye, cherry red S1. I bought it without much thinking when it came on sale last spring for a good prize. What an intense little beast it is with it's high strung 1.3 engine and close ratio box! I drove it few weeks and put it in garage after the blue car was ready for the summer. It came with bolt-on OMP roll-cage. After some driving I decided get rid of the cage. After all, it wasn't a proper racing cage, but more for show.
.jpg)
The current plan is to drive this car next winter, or sell it - difficult to say. I tend to be volatile sometimes. At the moment I treat it as if it was a "keeper". So it will receive some tender loving care, first in a form of new dampers and springs (one of the dampers was totally dead).
This is the position of the strut in non-PAS car (left hand side):

Right hand side:

Cleaned the strut a bit
.jpg)
and painted with Hammerite

The H&R spring is actually ment for 106GTI but at least the drive height seems just right even for this light car. The ride height is now 15mm higher than with the lowering springs that came with the car. Can't wait to drive this setup (still some work to do before). A bit more understeer maybe? I'm gonna put a 24mm ARB for the rear axle so a little bit of understeer at this point is not a problem.
Update: the right hand side was more work: wheel bearing had to be changed (only in finnish!) and some previous owner had assembled the metal strip that hold the break pads in a wrong way, resulting the metal strip to tear apart and the pads almost flying away. New break pad assembly kit had to be bought:

First I thought I could get a spare part from a spare 106GTI struts which I happen to have lying around, but not. The S1 rallye has BENDIX breaks, S2 has ATE and they are fundamentally different. The ATE ones are much more big and robust, no metal strips holding pads in place.
.jpg)
The current plan is to drive this car next winter, or sell it - difficult to say. I tend to be volatile sometimes. At the moment I treat it as if it was a "keeper". So it will receive some tender loving care, first in a form of new dampers and springs (one of the dampers was totally dead).
This is the position of the strut in non-PAS car (left hand side):

Right hand side:

Cleaned the strut a bit
.jpg)
and painted with Hammerite

The H&R spring is actually ment for 106GTI but at least the drive height seems just right even for this light car. The ride height is now 15mm higher than with the lowering springs that came with the car. Can't wait to drive this setup (still some work to do before). A bit more understeer maybe? I'm gonna put a 24mm ARB for the rear axle so a little bit of understeer at this point is not a problem.
Update: the right hand side was more work: wheel bearing had to be changed (only in finnish!) and some previous owner had assembled the metal strip that hold the break pads in a wrong way, resulting the metal strip to tear apart and the pads almost flying away. New break pad assembly kit had to be bought:

First I thought I could get a spare part from a spare 106GTI struts which I happen to have lying around, but not. The S1 rallye has BENDIX breaks, S2 has ATE and they are fundamentally different. The ATE ones are much more big and robust, no metal strips holding pads in place.
maanantai 4. lokakuuta 2010
Trackday...
Visited my first ever track day last weekend. It was organised in Alastaro circuit by a BMW club and I was there as a guest with a friend who owns a beemer. It was huge fun! I could drive (only) 4-5 rounds, the best time being 1:41.7. I'm gonna attend trackdays next year with my own car. Whether It'll be a rallye or something else I don't know. What I do know that I liked the way RWD handled in track...
lauantai 28. elokuuta 2010
Idle stepper motor
I had long suspected the idle stepper motor is not working properly. Sometimes it felt that the car runs like there was an air leak. Removed the idle motor out for inspection. In Rallye, the idle motor is quite difficult to access, easiest is to operate through a hole in fender... Cleaned the shaft of the motor but it didn't help. New motor needed.
The same idle motor is used in following vehicles (PSA-#1920V7/#19206Q , symmetrical fastening):
306 1,8-16V 97 [1997-2002]
Xantia 1,8-16V [1993-2001]
ZX 1,8i-16V [1991-1997]
406 1,8-16V [1996-2000]
Cheap aftermarket units exist but I bought a Marelli unit. Assembled and car runs finer than in a long time.
Speaking of engine control equipment, lambda sensor and crankshaft position sensor are fairly new too, changed them couple of years ago. I have had bad experience with cheap aftermarket lambda sensors in my ex 205 so nowadays when it comes to engine sensors, I prefer the original items even though they are more expensive.
Strut trouble
Noticed a nasty problem at the front, suspension bottomed out too easely. Even quite small obstacles on the road resulted a bang in the shocks. That was strange because I had assembled the shorter versions of Bilsteins, the Sprints together with the H&R lowering springs. This combination should not bottom out.
Had to dismantle the McPhersons to see what's the problem. To my surprise the number in shock was a P30-3060, the number for Sport. Case closed. I should have been more sharp when assembling and not just trust the seller. Frustrating, but I don't think he mislead me on purpose. For the record, the number for Sprint is P30-3059.
Put back the original springs and the bottoming problem was gone. Top mounts was put to a non-PAS position.
The track rod ends were loose, changed them both end.
Exhausts trials
Changed the near original exhaust (backbox was freeflowing Martelius unit) to Supersprint race exhaust. It is not loud at idle but give it some throttle... Now that's Rallye spirit! I really liked it, and it's huge fun in short blasts, but not for longer trips. So I changed the orig exhaust back for summer holiday trips. It takes only about 1/2 hour to change so swap back and forth is not a problem.
Weights:
orig 16kg
SS 8.8kg
Weights:
orig 16kg
SS 8.8kg
Axle repair finished
Axle assembled to car! I did it by myself, only once dropped the axle from the jack... Scared but not injured. Made a kind of loop to the jack from a strip of tin plate to prevent dropping again, after that assembly was a childs play.
Connecting the front pipes to the pressure regulator was not nice job. Little room to bend the pipes, underbody full of fresh wax, hands and tools in wax... New bumpstop rubbers installed while there. Brakes bleeded. Who idiot selected the rear bleed nipple? Why it had to be 6mm, whats wrong with size 11mm as in front?
While connecting the hand brake cables, it was clear that the cables needed to be changed. The lefthand side was completely stuck. Right side was better but no point leaving that unchanged, cables were only 10e a piece. Cable end is located under front muffler heat shield. While removing heat shield, some of the retaining bolts snapped. Fixed those with rivet nuts. While under the car, added some cavity wax to the whole underbody with brush.
Catalytic converter and exhaust assembled to car. At some point the fixing bolt of the downpipe has fell off, put a new 10mm bolt there (30mm lenght). Car ready for MOT.
Car passed MOT! Front light adjustment motor didn't work, otherwise not complains.
Some rust repair
I had sprayed the back end of the car with cavity wax few years ago, so it was in ok condition. Only place that was not covered was under the rear exhaust heat shield. Took the shield off and noticed that the other side of the shield was full of rust, also there was some rust in the body under the shield. Half of the shield cleaned with electrolysis
 Friend cleaning the other side with solvent
 That's good enough
 Hammerite'd
 Cleaned the rust from under body as good as could be done with hand tools and sprayed a lot cavity wax to the back end. Assembled the heat shield into place.
Got new screw for the brake pressure regulator from England (106parts), the special screw is another small thing that is ridigously prized in local dealer.


Got new screw for the brake pressure regulator from England (106parts), the special screw is another small thing that is ridigously prized in local dealer.
Brake lines
My first flare
 Flaring is easy, I just followed the instructions of the tool. Even though flaring is easy, I made two kinds of mistakes. Remember

.jpg)
.jpg)
.jpg)
.jpg)
.jpg)

- put flare nipple (or nut) on the pipe before flaring
- slide flare nut to the end of pipe before bending the line into shape
May seem trivial but easely forgotten during the work and resulting the need of cutting the new flare and starting all over... Specially nasty if working under the car.
Goodridge hoses (SPE0103-4P)

New Fremax brake discs
.jpg)
brake lines assembled
.jpg)
.jpg)
.jpg)
.jpg)
Axle ready for assembly. Car not yet.
Axle repair continues...
Two-component top coat paint
.jpg)
Center tube was almost rust free, only light sanding needed before two coats of 2k-paint, color and lacquer

 It's a feckin' miracle if this get rost again! :-) The tube was so pretty that it's a shame to put in back to the car.
Next I cleaned and painted torsion bars and longitunal arms. Light red color of bars changed to black.
The iron parts of rear brake calipers were cleaned in electrolysis (including pistons!), as they were in thick rust. Otherwise the assembly is aluminum, didn't bother cleaning that. New seals were fitted to calipers. Backplates were also cleaned in electrolysis.

DIY dummy shock absorber
 Assembled new bearings and seals to longitunal arms using vise. Added grease nipples to arms. The location is 28mm from the inner edge. According my measurements there is only one millimeter space between the plastic sleeve and stub pin. I hope that's enough. We'll see.
Washers #72
 were so badly corroded that they had to be renewed.
Peugeot sport bushes
 The correct angle can be seen from the old beam

 Exploded pic (from AX GT/Sport)
 Bushes and brake pressure regulator in place
 ARB endplate
 Torsion bars and arb assembled

.jpg)
Center tube was almost rust free, only light sanding needed before two coats of 2k-paint, color and lacquer


Next I cleaned and painted torsion bars and longitunal arms. Light red color of bars changed to black.
The iron parts of rear brake calipers were cleaned in electrolysis (including pistons!), as they were in thick rust. Otherwise the assembly is aluminum, didn't bother cleaning that. New seals were fitted to calipers. Backplates were also cleaned in electrolysis.

DIY dummy shock absorber

Washers #72

Peugeot sport bushes


sunnuntai 22. elokuuta 2010
Rear axle repair start
The end plate of rear anti-roll bar (ARB) had become loose. This is how it looked underneath
 Bad, very bad.... Clearly the outer seal hadn't kept the water out for some time. Not long time after that there was play in the suspension arm that was coming from the axle bearing housing... Game over. The feared axle repair was in order. Luckily at that time I already had a small heated garage as winter was coming. I bought another cheap car for the winter and decided to keep rallye in garage for the whole winter.
Look from the underneath
 The axle itself is easy to remove as it is kept in place with only 4 bolts, I struggled with brake pipe nipples and eventially ended up just cutting the pipes. Hand brake cables were stuck in the rear brake levers, too. After the axle is out of car the fun begins - the removal of the torsion bars! I made a tool for that from a old torsion bar
.jpg) This is how I hit the first bar out of axle
This is how I hit the first bar out of axle
.jpg) The other end was hit from above
The other end was hit from above
.jpg) A washer was used between the torsion bar and tool to prevent damaging the torsion bar end. Washer looked quite damaged afterwards.
A washer was used between the torsion bar and tool to prevent damaging the torsion bar end. Washer looked quite damaged afterwards.
The needle bearings had eaten longitunal grooves

to the stub pin, by the process called false brinelling or fretting. Water quickens the process, but I think all peugeot torsion bar suspensions suffer this sooner or later if not lubricated on a regular basis.
The center beam could have been repaired by changing the stub pins for new ones, there exists some shops that sell them, for example this. Changing the pins seemed too much of a trouble, so I looked for a second hand axle. Actually I ended having two spare axles, one from a '93 106 and one from a '00 saxo. I disassembled both of them to see the condition of stub pins. Both were ok, kept the newer axle and sold the older. There seems to be demand for spare axles by the way, I received several calls even months later for the one I had for sale.
I wanted to have the beam cleaned before assembly, so called to a firm that do sand blasting and powder coating. The quote was quite reasonable. However, as I had time and curiosity for anything new, I ended up trying electrolysis. The longitunal cast iron arms were in thick rust, but not after the electrolysis bath
.JPG) After zinc paint
After zinc paint
.jpg) Also tried to recondition the break pressure regulator, but couldn't have it working. The other regulator valve was so stuck that it couldn't loosen it properly. Bought a new regulator from ebay (GB), I think it cost about 20e. It was for AX and had different size pipe nipple holes but that was not a problem as I needed new brake pipes anyway.
Also tried to recondition the break pressure regulator, but couldn't have it working. The other regulator valve was so stuck that it couldn't loosen it properly. Bought a new regulator from ebay (GB), I think it cost about 20e. It was for AX and had different size pipe nipple holes but that was not a problem as I needed new brake pipes anyway.

Look from the underneath

.jpg)
.jpg)
.jpg)
The needle bearings had eaten longitunal grooves

to the stub pin, by the process called false brinelling or fretting. Water quickens the process, but I think all peugeot torsion bar suspensions suffer this sooner or later if not lubricated on a regular basis.
The center beam could have been repaired by changing the stub pins for new ones, there exists some shops that sell them, for example this. Changing the pins seemed too much of a trouble, so I looked for a second hand axle. Actually I ended having two spare axles, one from a '93 106 and one from a '00 saxo. I disassembled both of them to see the condition of stub pins. Both were ok, kept the newer axle and sold the older. There seems to be demand for spare axles by the way, I received several calls even months later for the one I had for sale.
I wanted to have the beam cleaned before assembly, so called to a firm that do sand blasting and powder coating. The quote was quite reasonable. However, as I had time and curiosity for anything new, I ended up trying electrolysis. The longitunal cast iron arms were in thick rust, but not after the electrolysis bath
.JPG)
.jpg)
PAS removal
Then I removed the PAS. Who needs assisted steering in a car that weights about 900kg? I have always liked the steering feel of cars without PAS. My old 205XS had such a nice steering feel that I still think of it fondly ;-) Had to find plugs for the steering rack oil pipe holes, otherwise it was a straightforward job. Also I changed the bolt that used to hold the pas piston arm for a shorter one. 8.5 kg weigt saving.
Got rid of front light washer piping and water reservoir and the petrol wapour collecting canister.
Got rid of front light washer piping and water reservoir and the petrol wapour collecting canister.
Tranny whine
Started to have problems engaging 5th gear and tranny also whined when in fifth. Took out the fifth gear metal cover to have a look. The shaft nut at the end of secondary axle was loose. That nut holds the 5th gear synchro assembly in place. Loosening of that nut is a 'type problem' of the MA-gearboxes and Peugeot has since made a better locking nut to remedy that. I would have bought the evolution nut but the local Peugeot dealer had priced it so ridigously that I ended just tightening the old one. The 5th gear engagement was now ok, but whine did not go away. Probably changing of the whole 5th gear assembly is the only solution to the whine problem. I have plans to do it some day, as I'd like to try a little longer 5th gear ratio. The cover was cleaned from rust and painted - of course ;-)
lauantai 21. elokuuta 2010
Front suspension
Cleaned old wishbones from oily dirt and rust. Removed the rear bush myself using drill and angle grinder. If I'd do it again, i'd burn the rubber away and forget the drilling. However, the inner metal sleeve have to be removed with grinder. Bought new balljoints, front bushes (both genuine peugeot parts) and rear bushes (peugeot sport items) and brought the wishbones to my friends place to have them pressed into place by a 50 ton hydraulic press (thanks Toni). After that I replaced the aftermarket wishbones and sold them to a fellow 106 owner, Samuli R. Great guy btw, he sells stuff to a company I work for and everytime me meet (by accident) we have a cup of coffee and talk about cars.
Next I cleaned and painted the struts, assembled with new upper bearings (SKF), rubbers (peugeot sport), H&R lowering springs and Bilstein Sprint dampers (or so I thought! More of that later...).
Next I cleaned and painted the struts, assembled with new upper bearings (SKF), rubbers (peugeot sport), H&R lowering springs and Bilstein Sprint dampers (or so I thought! More of that later...).
keskiviikko 18. elokuuta 2010
Thirst
The reason for car being for sale became clear soon. It liked to drink oil. It was something like a litre/1000km or even more. I figured out that the problem could be caused by the hardened valve stem seals. I asked a quote from the pug dealer for the repair. They asked 1000e and insisted that it's a head out job. I decided to change them myself. I wrote a small Valve-Stem Seal HOWTO of the job.
Lower balljoints failed MOT. In a hurry, I purchased aftermarket wishbones and installed them in car park. It was winter time and the temperature was well below zero. Not most pleasant job. Special thanks to my friend Kimi who helped me in this operation.
Inlet seals replaced by new ones. Inlet leak sorted. That job was also carried out in car park, just before christmas.


The original rotten copper radiator replaced with new aluminum Valeo one. Aluminum rad weighs 1.85kg, exactly half as much as the old one. Big thanks to peugeot wizard "benkku" who helped in this operation, it was carried out in his garage (I didn't have my own yet).
Front brakes needed attention. This is how they looked after cleaning and painting. Old brake hoses changed to steel braided Goodridge ones. Rust removal was carried out with wire brush, vinegar, etc... Not very sophisticated nor wise, if I think about it in retrospective.
Lower balljoints failed MOT. In a hurry, I purchased aftermarket wishbones and installed them in car park. It was winter time and the temperature was well below zero. Not most pleasant job. Special thanks to my friend Kimi who helped me in this operation.
Inlet seals replaced by new ones. Inlet leak sorted. That job was also carried out in car park, just before christmas.


Front brakes needed attention. This is how they looked after cleaning and painting. Old brake hoses changed to steel braided Goodridge ones. Rust removal was carried out with wire brush, vinegar, etc... Not very sophisticated nor wise, if I think about it in retrospective.
_2.jpg)
tiistai 17. elokuuta 2010
The begin
This blog is about my Rallye, bought in august 2006. I have a blog in finnish language elsewhere, but now I thought it would be interesting to start an finglish one. So, here we go. At first there will be quite a lot of updates as I try to translate some stuff from the other blog here.
This is the car just after I bought it:

It's '97 model, PAS, no sunroof. It's got plate type LSD, unfortunately I have no idea of which brand. It had reasonable kilometers when I bought it, now it's driven about 160000 km.
This is the car just after I bought it:

Tilaa:
Kommentit (Atom)